2002-2007 Jeep Liberty 3.7L | Front Driver Side CV Axle Shaft | 663351 - PHILTOP

2002-2007 Jeep Liberty 3.7L | Front Driver Side CV Axle Shaft | 663351 - PHILTOP

Front Left

Built to Last

4.5

Check if this fits your vehicle

Select a vehicle to check this product.

SKU:
38ISSHA9117US

Specifications

Brand
PHILTOP
Position
Front Left
ABS Ring Included
Yes
Quantity
1
Input Shaft Spline Count
27
Material
SAE 1055 Steel and Chloroprene Rubber
Output Shaft Spline Count
27
Items Included
1x Front Left Cv Axle Shaft - 663351
Axle Nut Included
Yes
Warranty Period
2-Year
Part Number
663351

Highlights

  • Fitment: Front Left Axle Shaft for 2002-2007 Liberty 3.7L 4WD. Please use the compatibility verification tool provided by Philtop to confirm whether the cv axle shaft is suitable for your vehicle.
  • Reference Number: 5066021AA, 663351. CV shafts deliver outstanding performance and long-lasting durability.
  • Reliably: Enjoy a smoother, more reliable ride with our high-quality CV axles. The high quality materials and excellent performance of our half shafts provide reliable support for your vehicle!
  • High Quality: Half shafts are 100% ground to improve ball path and surface finish and extend product life.CV shafts are normalised to ensure stability in subsequent machining.
  • Function: Half shafts for equal speed power transmission and wheel steering through pendulum angle.CV axles are designed in strict accordance with OE standards, with 100% inspection of key mating dimensions.

Compatible Vehicles

Check if this fits your vehicle

Vehicle(s) Fit Information

Year20062002 - 20072002 - 200620052002 - 2007
MakeJeepJeepJeepJeepJeep
ModelLibertyLibertyLibertyLibertyLiberty
Trim65th Anniversary EditionLimitedRenegadeRocky Mountain EditionSport
Engine3.7L V63.7L V63.7L V63.7L V63.7L V6
Note-----

How to Install?

Installation Manual Download

User manual (PDF)
Download

Checks Before Installation

  • Confirm the vehicle, installation position, spline counts, mounting points and ABS components match.
  • Inspect the hub bearing, suspension parts, transmission mount and axle seal. Repair looseness, damage or leakage first.
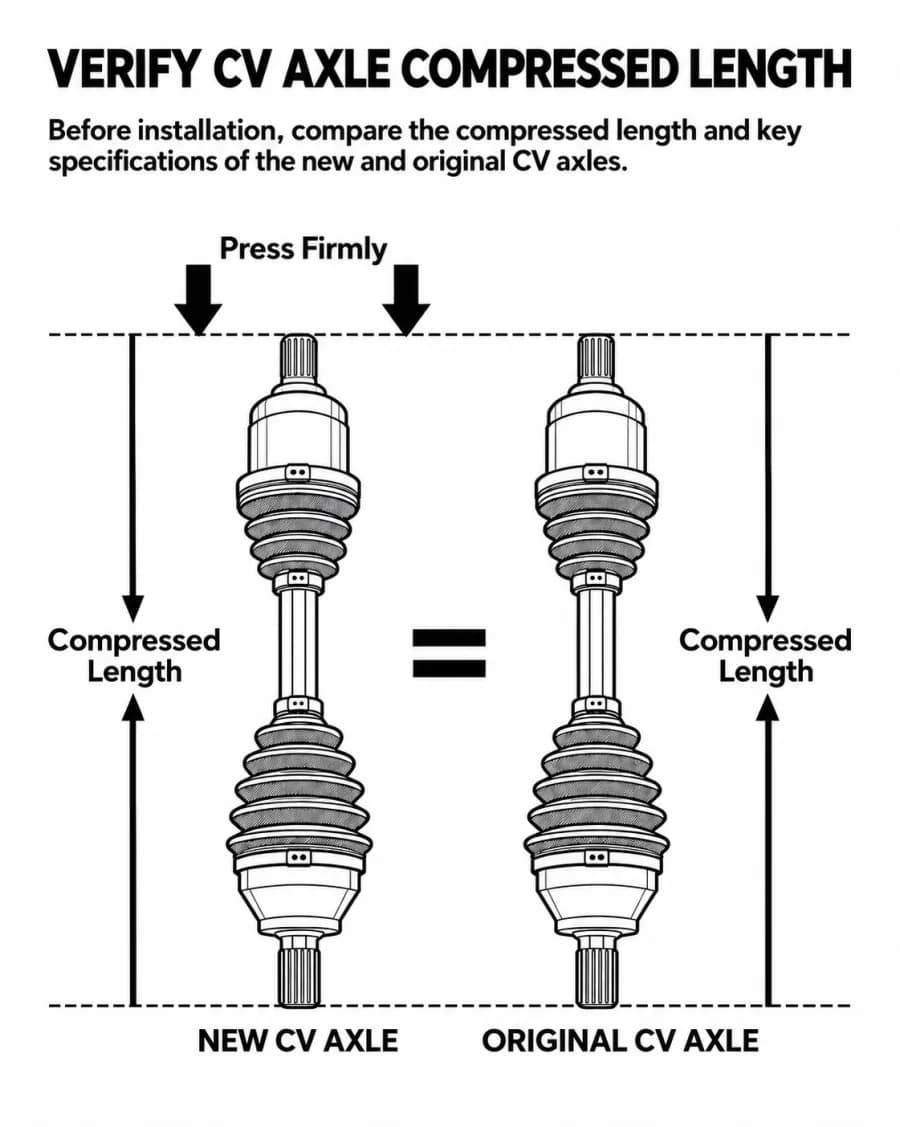
  • Compare the new and original axles in a fully compressed position. Confirm the compressed length and key dimensions match.
    Verify that the new and original CV axles have the same compressed length
  • Check that the boots, clamps, splines and supplied axle nut are complete and undamaged.
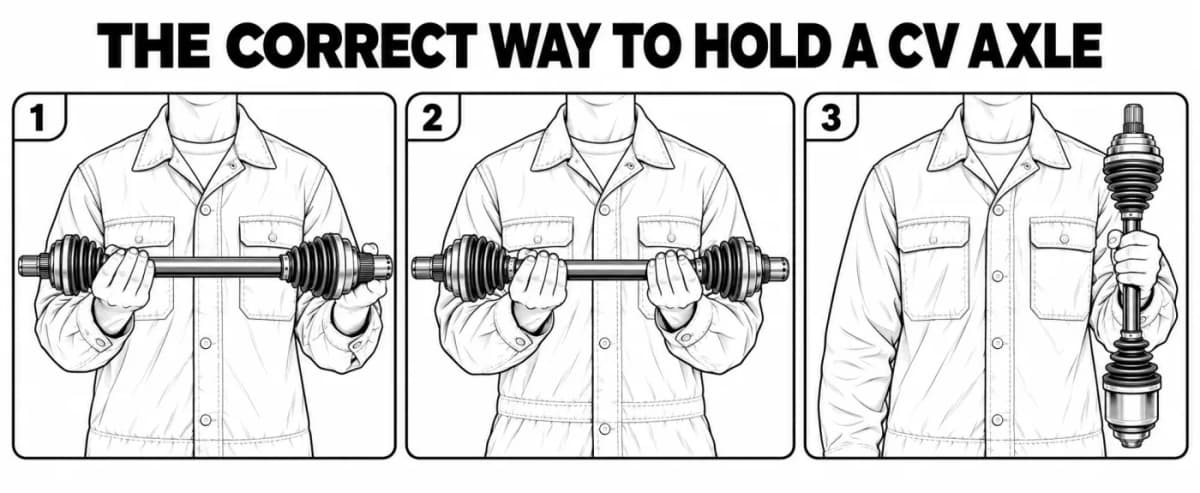
  • Support both CV joints when handling. Do not pull, sharply bend or carry the axle by its rubber boot.
    The correct way to hold a CV axle

Installation Steps

  • Step-1: Secure the Vehicle: Loosen the axle nut with the wheels on the ground. Raise the vehicle on a level surface and support it securely with jack stands.
  • Step-2: Remove the Old Axle: Remove the wheel and necessary suspension components. Separate the outer spline from the hub with the proper puller.
  • Step-3: Release the Inner Joint: Use a CV joint puller or slide hammer. Never strike the axle directly or pull it out with bolts. Be prepared for possible transmission-fluid loss.
  • Step-4: Install the New Axle: Clean the splines and seal-contact surface. Insert the inner joint straight into the transmission until the retaining ring fully locks, then install the outer spline into the hub.
  • Step-5: Reassemble and Torque: Reinstall all suspension components and use a new axle nut. Hand-start the fasteners and tighten everything to the vehicle manufacturer’s specified torque.
  • Step-6: Final Assembly: Reinstall the wheel, torque the lug nuts in a crisscross pattern and check or refill the specified transmission fluid if required.

After Installation

  • Confirm the inner joint is fully seated and all fasteners are secure.
  • Check the CV boots, clamps and axle seal for damage or leakage.
  • Rotate the wheel by hand and verify the axle moves smoothly without binding or contacting nearby components.
  • Perform a low-speed road test. Check for clicking while turning, clunking during acceleration, vibration and fluid leakage.
  • If suspension geometry was disturbed, have the wheel alignment checked.

Product Video

Product Description

12

Reviews

4.5/5

Based on 4 reviews

575%
40%
325%
20%
10%

Jennifer_Auto_234

04/20/2026

Came fast and was well-protected. Customer service was very helpful when I called. Overall a smooth and positive buying experience.

DaveTheMechanic_909

12/03/2025

Popped this into my Liberty and it fit like a charm. Felt much more solid than the old one. A great replacement option that doesn't cost an arm and a leg.

FAQS

No FAQs have been added for this product yet.