Sealed Dust Cover: The premium neoprene rubber boot effectively seals out dust. Exceptional high and low temperature performance ensures the CV shaft operates reliably in all weather conditions.
Long Service Life: The shaft of the CV axle is manufactured from high-quality steel with precision machining, resulting in superior strength.
Easy to install: Our CV shafts are manufactured to exacting standards, meeting OEM specifications for easy installation. The package includes all necessary accessories required for installation.
Compatible Vehicles
Check if this fits your vehicle
Vehicle(s) Fit Information
Year
2014
2017
2014
2014
2015
2015
2016
2016
2016
2014 - 2015
2014 - 2015
2014
2013 - 2017
2014
2013 - 2017
2013 - 2014
2013
2016
2016
2016 - 2018
2017
2017 - 2019
2017 - 2019
2017 - 2019
2015 - 2018
2014 - 2015
2017
2014 - 2015
2017
2013
2013
2011
2012
2009 - 2012
2012
2011
2013
2009
2017
2017 - 2018
2018 - 2019
2018 - 2019
Make
Polaris
Polaris
Polaris
Polaris
Polaris
Polaris
Polaris
Polaris
Polaris
Polaris
Polaris
Polaris
Polaris
Polaris
Polaris
Polaris
Polaris
Polaris
Polaris
Polaris
Polaris
Polaris
Polaris
Polaris
Polaris
Polaris
Polaris
Polaris
Polaris
Polaris
Polaris
Polaris
Polaris
Polaris
Polaris
Polaris
Polaris
Polaris
Polaris
Polaris
Polaris
Polaris
Model
RZR 4 800 EPS LE
RZR S 570 EPS
RZR S 800
RZR S 800 EPS LE
Ranger 570 EPS Full-Size
Ranger 570 Full-Size
Ranger 570 Full-Size
Ranger 570 XP
Ranger 570 XP EPS
Ranger 900 Crew
Ranger 900 Crew EPS
Ranger 900 Crew EPS LE
Ranger 900 XP
Ranger 900 XP Deluxe
Ranger 900 XP EPS
Ranger 900 XP EPS LE
Ranger 900 XP LE
Ranger 900-5 Crew
Ranger 900-5 Crew EPS
Ranger Crew Diesel
Ranger Crew XP 1000
Ranger Crew XP 1000 EPS
Ranger Crew XP 900
Ranger Crew XP 900 EPS
Ranger Diesel
Ranger Diesel HST
Ranger Diesel HST
Ranger Diesel HST Deluxe
Ranger Diesel HST Deluxe
Ranger RZR 4 800
Ranger RZR 4 800 EPS LE
Ranger RZR 4 800 EPS Robby Gordon
Ranger RZR 4 800 EPS Robby Gordon LE
Ranger RZR 800 S
Ranger RZR 800 S LE
Ranger RZR 800 SW Military
Ranger RZR S 800 EPS LE
Ranger RZR S Military
Ranger XP 1000
Ranger XP 1000 EPS
Ranger XP 900
Ranger XP 900 EPS
Trim
Base
Base
Base
Base
Base
Base
Base
Base
Base
Base
Base
Base
Base
Base
Base
Base
Base
Base
Base
Base
Base
Base
Base
Base
Base
Base
Base
Base
Base
Base
Base
Base
Base
Base
Base
Base
Base
Base
Base
Base
Base
Base
Engine
-
-
-
-
-
-
-
-
-
-
-
-
-
-
-
-
-
-
-
-
-
-
-
-
-
-
-
-
-
-
-
-
-
-
-
-
-
-
-
-
-
-
Note
Standard Duty Replacement
Standard Duty Replacement
Standard Duty Replacement
Standard Duty Replacement
Standard Duty Replacement
Standard Duty Replacement
Fronts do not fit R16RCA57 models;Standard Duty Replacement
Confirm the vehicle, installation position, spline counts, mounting points and ABS components match.
Inspect the hub bearing, suspension parts, transmission mount and axle seal. Repair looseness, damage or leakage first.
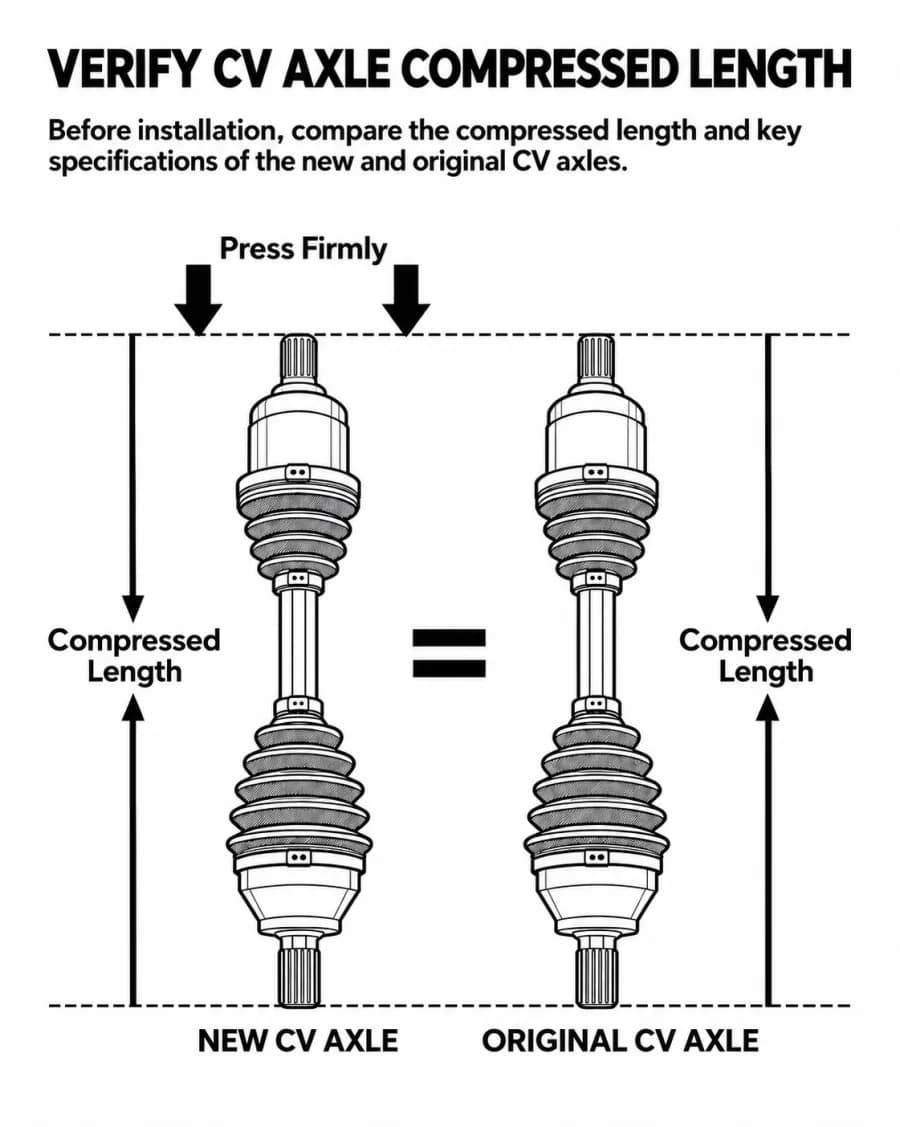
Compare the new and original axles in a fully compressed position. Confirm the compressed length and key dimensions match.
Check that the boots, clamps, splines and supplied axle nut are complete and undamaged.
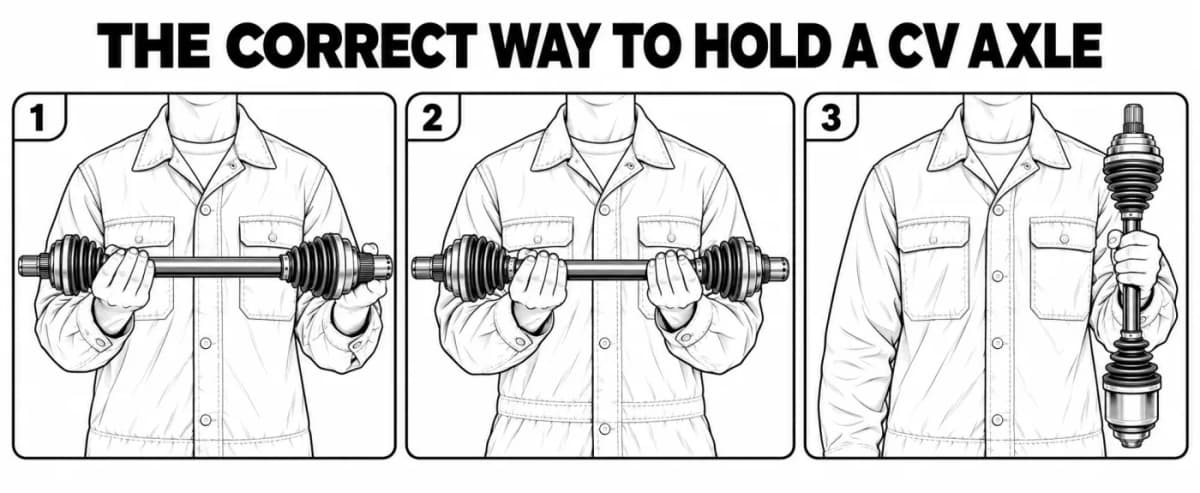
Support both CV joints when handling. Do not pull, sharply bend or carry the axle by its rubber boot.
Installation Steps
Step-1: Secure the Vehicle: Loosen the axle nut with the wheels on the ground. Raise the vehicle on a level surface and support it securely with jack stands.
Step-2: Remove the Old Axle: Remove the wheel and necessary suspension components. Separate the outer spline from the hub with the proper puller.
Step-3: Release the Inner Joint: Use a CV joint puller or slide hammer. Never strike the axle directly or pull it out with bolts. Be prepared for possible transmission-fluid loss.
Step-4: Install the New Axle: Clean the splines and seal-contact surface. Insert the inner joint straight into the transmission until the retaining ring fully locks, then install the outer spline into the hub.
Step-5: Reassemble and Torque: Reinstall all suspension components and use a new axle nut. Hand-start the fasteners and tighten everything to the vehicle manufacturer’s specified torque.
Step-6: Final Assembly: Reinstall the wheel, torque the lug nuts in a crisscross pattern and check or refill the specified transmission fluid if required.
After Installation
Confirm the inner joint is fully seated and all fasteners are secure.
Check the CV boots, clamps and axle seal for damage or leakage.
Rotate the wheel by hand and verify the axle moves smoothly without binding or contacting nearby components.
Perform a low-speed road test. Check for clicking while turning, clunking during acceleration, vibration and fluid leakage.
If suspension geometry was disturbed, have the wheel alignment checked.
Product Video
Product Description
Reviews
4.6/5
Based on 8 reviews
5
75%
4
13%
3
13%
2
0%
1
0%
M
Mil
09/29/2026
Verified buyer
It has good quality, fits well, and is easy to install. It looks durable and transfers power efficiently. After using it, I found that it has great quality and performs very well. Overall, I like it and it works very well for me.
R
Rob_HomeGarage_239
11/30/2025
My Ranger was pulling to one side, but these new axles fixed that right up. Drives straight and true now. So glad I got these, huge difference.
FAQS
Fitment depends on the engine, transmission, and whether your car has ABS. Please enter your vehicle's Brand, Year, and Model into the "Fitment Checker" at the top of the page to confirm a match.
Most CV axles are side-specific due to different lengths. Please check the "Placement on Vehicle" section in our specifications table to ensure you are ordering the correct side for your repair.
The number of teeth (splines) on the ends must match exactly. Please refer to the "Technical Specifications" on this page to verify the Inner and Outer Spline counts before purchasing.
Add your vehicle to ensure fitment
Make
Model
Trim
Engine
Loading vehicle options...
Choose Year, Make, and Model to check exact fitment.
2009 Polaris Ranger RZR S Military | Front Driver Side & Passenger Side ATV/UTV Compatible CV Axle 27.03in | POL7023 - PHILTOP
Front
Built to Last
SKU:
4354SHA202MUS
4.6
$122.90$12290
Check if this fits your vehicle
Select a vehicle to check this product.
Position
Front
ABS Ring Included
No
Quantity
2
Input Shaft Spline Count
22
Material
SAE 1055 Steel and Chloroprene Rubber
Output Shaft Spline Count
26
Items Included
2x Front Cv Axle Shaft
Axle Nut Included
Yes
Specific Fit: CV Axle Shaft Assembly Fits 2009-2012 Ranger RZR 800 S, 2013-2017 Ranger 900 XP/900 XP EPS, 2017-2019 Ranger Crew XP 900/900 EPS/1000 EPS, 2018-2019 Ranger XP 900/900 EPS, 2009-2009 Ranger RZR S Military, 2014-2015 Ranger 900 Crew/900 Crew EPS, Ranger Diesel HST/HST Deluxe, 2017-2018 Ranger XP 1000 EPS, 2015-2016 Ranger 570 Full-Size, 2013-2014 Ranger 900 XP EPS LE, 2011-2011 Ranger RZR 4 800 EPS Robby Gordon, Ranger RZR 800 SW Military, 2012-2012 Ranger RZR 4 800 EPS Robby Gordon LE, Ranger RZR 800 S LE, 2013-2013 Ranger RZR S 800/800 EPS LE, Ranger RZR 4 800 EPS LE, Ranger 900 XP LE.
Sealed Dust Cover: The premium neoprene rubber boot effectively seals out dust. Exceptional high and low temperature performance ensures the CV shaft operates reliably in all weather conditions.
Long Service Life: The shaft of the CV axle is manufactured from high-quality steel with precision machining, resulting in superior strength.
Easy to install: Our CV shafts are manufactured to exacting standards, meeting OEM specifications for easy installation. The package includes all necessary accessories required for installation.
4.6
8 reviews
5 star: 6
4 star: 1
3 star: 1
Compatible Vehicles
Check if this fits your vehicle
Year
Make
Model
Trim
Engine
Notes
2014
Polaris
RZR 4 800 EPS LE
Base
-
Standard Duty Replacement
2017
Polaris
RZR S 570 EPS
Base
-
Standard Duty Replacement
2014
Polaris
RZR S 800
Base
-
Standard Duty Replacement
2014
Polaris
RZR S 800 EPS LE
Base
-
Standard Duty Replacement
2015
Polaris
Ranger 570 EPS Full-Size
Base
-
Standard Duty Replacement
2015
Polaris
Ranger 570 Full-Size
Base
-
Standard Duty Replacement
2016
Polaris
Ranger 570 Full-Size
Base
-
Fronts do not fit R16RCA57 models;Standard Duty Replacement
Confirm the vehicle, installation position, spline counts, mounting points and ABS components match.
Inspect the hub bearing, suspension parts, transmission mount and axle seal. Repair looseness, damage or leakage first.
Compare the new and original axles in a fully compressed position. Confirm the compressed length and key dimensions match.
Check that the boots, clamps, splines and supplied axle nut are complete and undamaged.
Support both CV joints when handling. Do not pull, sharply bend or carry the axle by its rubber boot.
Installation Steps
Step-1: Secure the Vehicle: Loosen the axle nut with the wheels on the ground. Raise the vehicle on a level surface and support it securely with jack stands.
Step-2: Remove the Old Axle: Remove the wheel and necessary suspension components. Separate the outer spline from the hub with the proper puller.
Step-3: Release the Inner Joint: Use a CV joint puller or slide hammer. Never strike the axle directly or pull it out with bolts. Be prepared for possible transmission-fluid loss.
Step-4: Install the New Axle: Clean the splines and seal-contact surface. Insert the inner joint straight into the transmission until the retaining ring fully locks, then install the outer spline into the hub.
Step-5: Reassemble and Torque: Reinstall all suspension components and use a new axle nut. Hand-start the fasteners and tighten everything to the vehicle manufacturer’s specified torque.
Step-6: Final Assembly: Reinstall the wheel, torque the lug nuts in a crisscross pattern and check or refill the specified transmission fluid if required.
After Installation
Confirm the inner joint is fully seated and all fasteners are secure.
Check the CV boots, clamps and axle seal for damage or leakage.
Rotate the wheel by hand and verify the axle moves smoothly without binding or contacting nearby components.
Perform a low-speed road test. Check for clicking while turning, clunking during acceleration, vibration and fluid leakage.
If suspension geometry was disturbed, have the wheel alignment checked.
Product Video
Product Description
Reviews
4.6/5
Based on 8 reviews
5
75%
4
13%
3
13%
2
0%
1
0%
M
Mil
Sep 29,2026
Verified buyer
It has good quality, fits well, and is easy to install. It looks durable and transfers power efficiently. After using it, I found that it has great quality and performs very well. Overall, I like it and it works very well for me.
R
Rob_HomeGarage_239
Nov 30,2025
My Ranger was pulling to one side, but these new axles fixed that right up. Drives straight and true now. So glad I got these, huge difference.
FAQS
Fitment depends on the engine, transmission, and whether your car has ABS. Please enter your vehicle's Brand, Year, and Model into the "Fitment Checker" at the top of the page to confirm a match.
Most CV axles are side-specific due to different lengths. Please check the "Placement on Vehicle" section in our specifications table to ensure you are ordering the correct side for your repair.
The number of teeth (splines) on the ends must match exactly. Please refer to the "Technical Specifications" on this page to verify the Inner and Outer Spline counts before purchasing.


 Front




 Verified buyer
