


RickFixIt_418

12/23/2025
Came very quickly and installed without any issues. Everything lined up properly, and it was a much easier job than I anticipated. Great part!

 Front Left
Built to Last
Check if this fits your vehicle
Select a vehicle to check this product.
Check if this fits your vehicle
| Year | 2006 | 2005 - 2009 | 2009 | 2005 - 2007 | 2005 - 2008 | 2011 - 2013 | 2010 - 2013 | 2012 - 2013 | 2010 | 2011 - 2013 | 2011 | 2013 | 2012 | 2006 - 2009 | 2010 - 2013 | 2012 - 2013 | 2008 | 2006 - 2009 | 2010 - 2013 |
|---|---|---|---|---|---|---|---|---|---|---|---|---|---|---|---|---|---|---|---|
| Make | Land Rover | Land Rover | Land Rover | Land Rover | Land Rover | Land Rover | Land Rover | Land Rover | Land Rover | Land Rover | Land Rover | Land Rover | Land Rover | Land Rover | Land Rover | Land Rover | Land Rover | Land Rover | Land Rover |
| Model | LR3 | LR3 | LR3 | LR3 | LR3 | LR4 | LR4 | LR4 | LR4 | Range Rover Sport | Range Rover Sport | Range Rover Sport | Range Rover Sport | Range Rover Sport | Range Rover Sport | Range Rover Sport | Range Rover Sport | Range Rover Sport | Range Rover Sport |
| Trim | Base | HSE | HSE Lux | SE | SE | Base | HSE | HSE Lux | V8 | Autobiography | GT Limited Edition | GT Limited Edition | GT Limited Edition 3 | HSE | HSE | HSE Lux | LE | Supercharged | Supercharged |
| Engine | 4.0L V6 | 4.4L V8 | 4.4L V8 | 4.0L V6 | 4.4L V8 | 5.0L V8 | 5.0L V8 | 5.0L V8 | 5.0L V8 | 5.0L V8 | 5.0L V8 | 5.0L V8 | 5.0L V8 | 4.4L V8 | 5.0L V8 | 5.0L V8 | 4.2L V8 | 4.2L V8 | 5.0L V8 |
| Note | - | - | - | - | - | - | - | - | - | - | - | - | - | - | - | - | - | - | - |
 User manual (PDF)


4.5/5
Based on 6 reviews
RickFixIt_418
12/23/2025
Came very quickly and installed without any issues. Everything lined up properly, and it was a much easier job than I anticipated. Great part!
Rob_HomeGarage_287
03/23/2026
My steering felt loose and I was hearing noises, but this fixed it right up. The car drives so much better now, it's like night and day. Highly recommend.
Fitment depends on the engine, transmission, and whether your car has ABS. Please enter your vehicle's Brand, Year, and Model into the "Fitment Checker" at the top of the page to confirm a match.
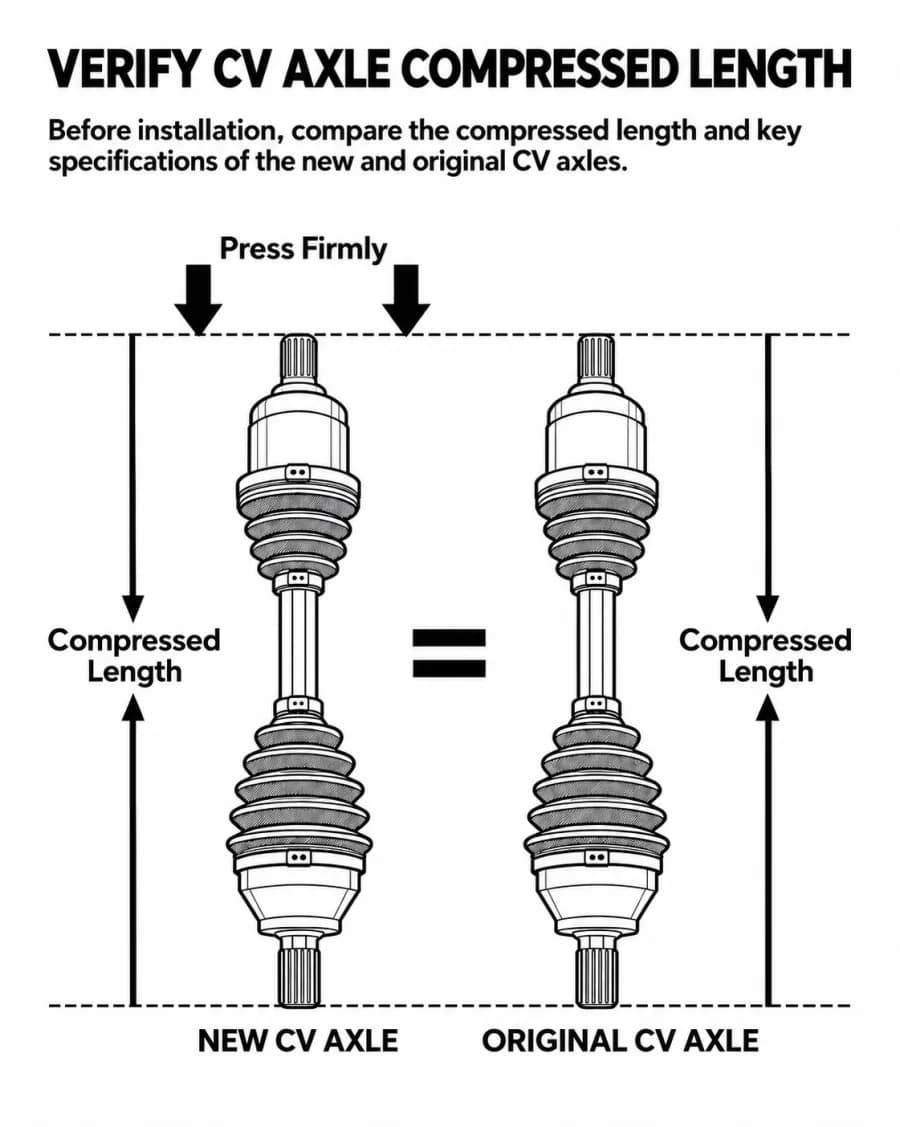
Most CV axles are side-specific due to different lengths. Please check the "Placement on Vehicle" section in our specifications table to ensure you are ordering the correct side for your repair.
The number of teeth (splines) on the ends must match exactly. Please refer to the "Technical Specifications" on this page to verify the Inner and Outer Spline counts before purchasing.
Loading vehicle options...
Choose Year, Make, and Model to check exact fitment.Front Left
Built to Last
Check if this fits your vehicle
Select a vehicle to check this product.
6 reviews
5 star: 4
4 star: 1
3 star: 1
Check if this fits your vehicle
| Year | Make | Model | Trim | Engine | Notes |
|---|---|---|---|---|---|
| 2006 | Land Rover | LR3 | Base | 4.0L V6 | - |
| 2005 - 2009 | Land Rover | LR3 | HSE | 4.4L V8 | - |
| 2009 | Land Rover | LR3 | HSE Lux | 4.4L V8 | - |
| 2005 - 2007 | Land Rover | LR3 | SE | 4.0L V6 | - |
| 2005 - 2008 | Land Rover | LR3 | SE | 4.4L V8 | - |
| 2011 - 2013 | Land Rover | LR4 | Base | 5.0L V8 | - |
| 2010 - 2013 | Land Rover | LR4 | HSE | 5.0L V8 | - |
| 2012 - 2013 | Land Rover | LR4 | HSE Lux | 5.0L V8 | - |
| 2010 | Land Rover | LR4 | V8 | 5.0L V8 | - |
| 2011 - 2013 | Land Rover | Range Rover Sport | Autobiography | 5.0L V8 | - |
| 2011 | Land Rover | Range Rover Sport | GT Limited Edition | 5.0L V8 | - |
| 2013 | Land Rover | Range Rover Sport | GT Limited Edition | 5.0L V8 | - |
| 2012 | Land Rover | Range Rover Sport | GT Limited Edition 3 | 5.0L V8 | - |
| 2006 - 2009 | Land Rover | Range Rover Sport | HSE | 4.4L V8 | - |
| 2010 - 2013 | Land Rover | Range Rover Sport | HSE | 5.0L V8 | - |
| 2012 - 2013 | Land Rover | Range Rover Sport | HSE Lux | 5.0L V8 | - |
| 2008 | Land Rover | Range Rover Sport | LE | 4.2L V8 | - |
| 2006 - 2009 | Land Rover | Range Rover Sport | Supercharged | 4.2L V8 | - |
| 2010 - 2013 | Land Rover | Range Rover Sport | Supercharged | 5.0L V8 | - |
User manual (PDF)4.5/5
Based on 6 reviews
RickFixIt_418
Dec 23,2025
Came very quickly and installed without any issues. Everything lined up properly, and it was a much easier job than I anticipated. Great part!
Rob_HomeGarage_287
Mar 23,2026
My steering felt loose and I was hearing noises, but this fixed it right up. The car drives so much better now, it's like night and day. Highly recommend.
Fitment depends on the engine, transmission, and whether your car has ABS. Please enter your vehicle's Brand, Year, and Model into the "Fitment Checker" at the top of the page to confirm a match.
Most CV axles are side-specific due to different lengths. Please check the "Placement on Vehicle" section in our specifications table to ensure you are ordering the correct side for your repair.
The number of teeth (splines) on the ends must match exactly. Please refer to the "Technical Specifications" on this page to verify the Inner and Outer Spline counts before purchasing.
