2002-2009 Chevrolet Trailblazer 4.2L L6 | Front Driver Side & Passenger Side CV Axle Shaft | 601345 - PHILTOP

2002-2009 Chevrolet Trailblazer 4.2L L6 | Front Driver Side & Passenger Side CV Axle Shaft | 601345 - PHILTOP

Front

Built to Last

4.7

Check if this fits your vehicle

Select a vehicle to check this product.

SKU:
8888SHA3109US

Specifications

Brand
PHILTOP
Position
Front
ABS Ring Included
No
Quantity
2
Input Shaft Spline Count
26
Material
SAE 1055 Steel and Chloroprene Rubber
Output Shaft Spline Count
27
Items Included
2x Front Cv Axle Shaft - 60-1345
Axle Nut Included
Yes
Warranty Period
2-Year
Part Number
601345

Highlights

  • Vehicle Fitment: Front CV Axle for Trailblazer 2002-2009, Envoy 2002-2009, Trailblazer EXT 2002-2006, Envoy XL 2002-2006, Rainier 2004-2007, Bravada 2002-2004, 9-7x 2005-2009, Envoy XUV 2004-2005, Ascender 2003-2008.Please use the Suncentauto filter to confirm that the half shaft fits your vehicle!
  • Quality Control: The ball cage of the half-shaft is heat-treated in one piece to ensure more stable subsequent processing of the cv axle shaft.All half shafts undergo three levels of inspection and control to ensure factory quality.
  • Good Sealing: Half shaft dust cover is made of natural neoprene, high temperature resistance 100 degrees, low temperature resistance -45 degrees.Enables cv axle half-shafts to be adapted to extreme environments.
  • Long Service Life: The cv axle half shafts are made of 20CrMnTi. It makes the half shaft have better fatigue strength, good toughness and wear resistance.
  • Function: A new drive half-shaft transmits power well for a more comfortable and smooth ride. Solve problems such as difficult steering and rattling of the vehicle.

Compatible Vehicles

Check if this fits your vehicle

Vehicle(s) Fit Information

Year2004 - 20072004 - 20072004 - 20052004 - 2005200820082002 - 20072006 - 20072002 - 20092006 - 20082002 - 20032002 - 20042003 - 20062003 - 20062002 - 20062003 - 20062002 - 20042003 - 20042005 - 20092002 - 20092002 - 20092005 - 20062002 - 20062003 - 20052002 - 20062003 - 20052004 - 20052004 - 20052004 - 20052004 - 20052003200620032003 - 20062003 - 200620032003 - 20052004 - 20052007 - 200820052002 - 20042006 - 20092006 - 20092008 - 200920052005
MakeBuickBuickBuickBuickChevroletChevroletChevroletChevroletChevroletChevroletChevroletChevroletChevroletChevroletChevroletChevroletChevroletChevroletGMCGMCGMCGMCGMCGMCGMCGMCGMCGMCGMCGMCIsuzuIsuzuIsuzuIsuzuIsuzuIsuzuIsuzuIsuzuIsuzuIsuzuOldsmobileSaabSaabSaabSaabSaab
ModelRainierRainierRainierRainierTrailblazerTrailblazerTrailblazerTrailblazerTrailblazerTrailblazerTrailblazerTrailblazerTrailblazer EXTTrailblazer EXTTrailblazer EXTTrailblazer EXTTrailblazer EXTTrailblazer EXTEnvoyEnvoyEnvoyEnvoy XLEnvoy XLEnvoy XLEnvoy XLEnvoy XLEnvoy XUVEnvoy XUVEnvoy XUVEnvoy XUVAscenderAscenderAscenderAscenderAscenderAscenderAscenderAscenderAscenderAscenderBravada9-7x9-7x9-7x9-7x9-7x
TrimCXLCXLCXL PlusCXL PlusBaseBaseLSLSLTLTLTZNorth FaceLSLSLTLTNorth FaceNorth FaceDenaliSLESLTDenaliSLESLESLTSLTSLESLESLTSLTBaseBaseBaseLSLSLimitedLimitedSSSBase4.2i5.3iAeroArcLinear
Engine4.2L L65.3L V84.2L L65.3L V84.2L L65.3L V84.2L L65.3L V84.2L L65.3L V84.2L L64.2L L64.2L L65.3L V84.2L L65.3L V84.2L L65.3L V85.3L V84.2L L64.2L L65.3L V84.2L L65.3L V84.2L L65.3L V84.2L L65.3L V84.2L L65.3L V84.2L L64.2L L65.3L V84.2L L65.3L V84.2L L65.3L V84.2L L64.2L L65.3L V84.2L L64.2L L65.3L V86.0L V85.3L V84.2L L6
Note----------------------------------------------

How to Install?

Installation Manual Download

User manual (PDF)
Download

Checks Before Installation

  • Confirm the vehicle, installation position, spline counts, mounting points and ABS components match.
  • Inspect the hub bearing, suspension parts, transmission mount and axle seal. Repair looseness, damage or leakage first.
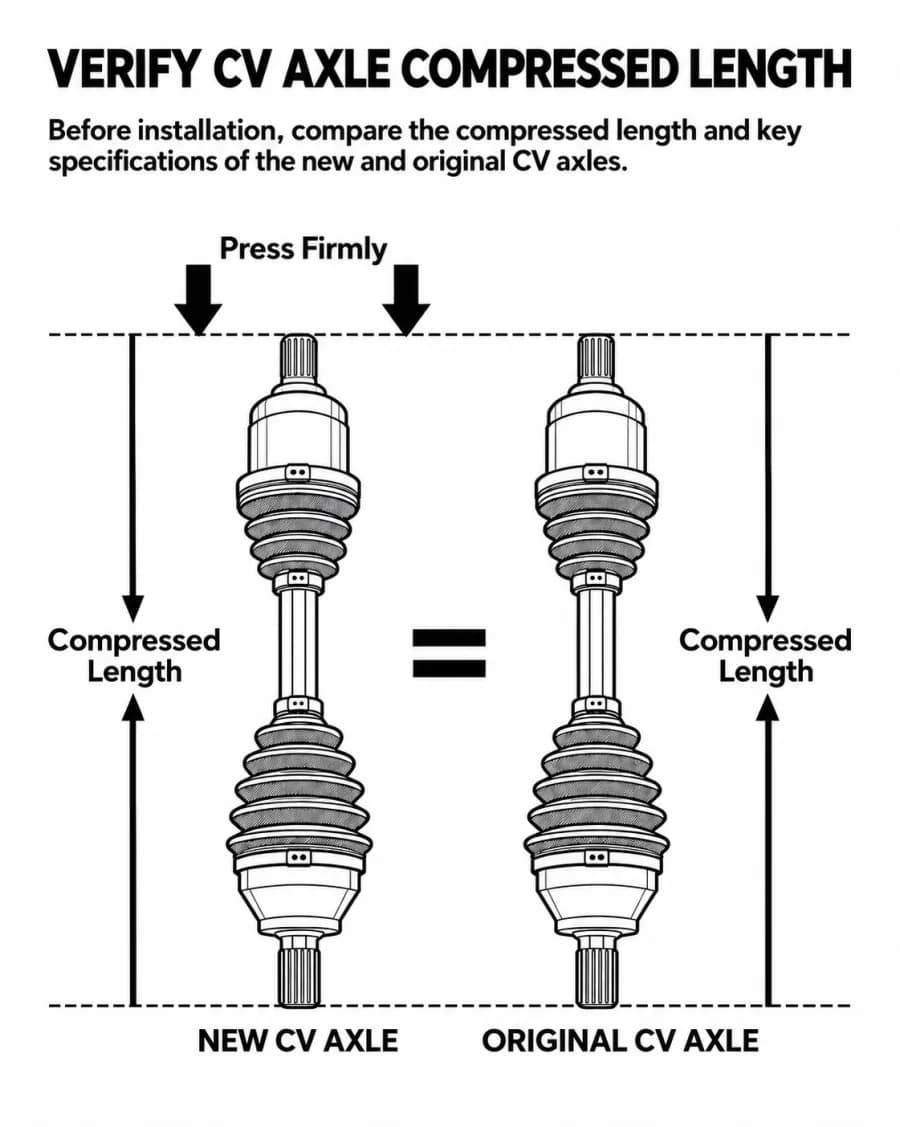
  • Compare the new and original axles in a fully compressed position. Confirm the compressed length and key dimensions match.
    Verify that the new and original CV axles have the same compressed length
  • Check that the boots, clamps, splines and supplied axle nut are complete and undamaged.
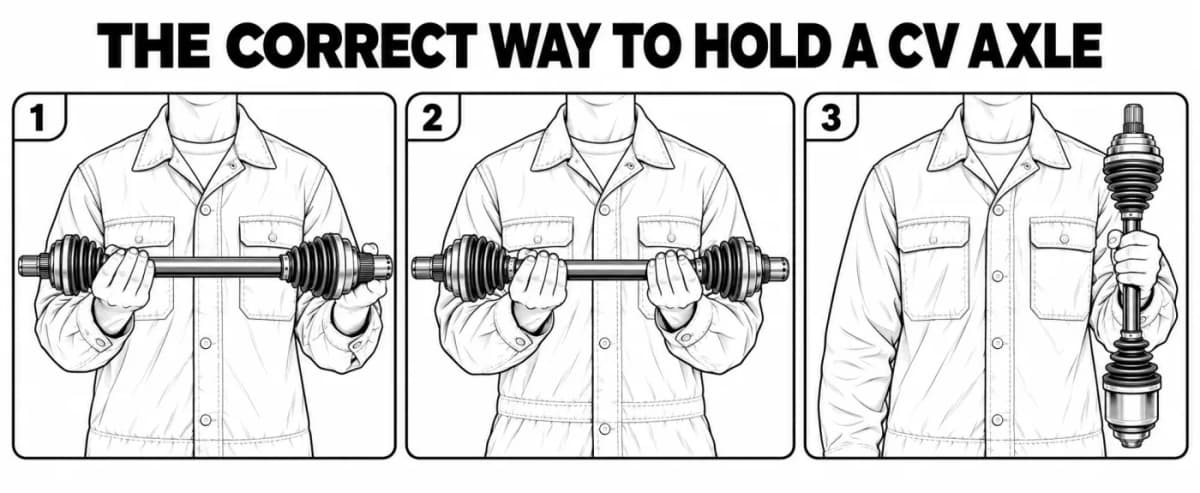
  • Support both CV joints when handling. Do not pull, sharply bend or carry the axle by its rubber boot.
    The correct way to hold a CV axle

Installation Steps

  • Step-1: Secure the Vehicle: Loosen the axle nut with the wheels on the ground. Raise the vehicle on a level surface and support it securely with jack stands.
  • Step-2: Remove the Old Axle: Remove the wheel and necessary suspension components. Separate the outer spline from the hub with the proper puller.
  • Step-3: Release the Inner Joint: Use a CV joint puller or slide hammer. Never strike the axle directly or pull it out with bolts. Be prepared for possible transmission-fluid loss.
  • Step-4: Install the New Axle: Clean the splines and seal-contact surface. Insert the inner joint straight into the transmission until the retaining ring fully locks, then install the outer spline into the hub.
  • Step-5: Reassemble and Torque: Reinstall all suspension components and use a new axle nut. Hand-start the fasteners and tighten everything to the vehicle manufacturer’s specified torque.
  • Step-6: Final Assembly: Reinstall the wheel, torque the lug nuts in a crisscross pattern and check or refill the specified transmission fluid if required.

After Installation

  • Confirm the inner joint is fully seated and all fasteners are secure.
  • Check the CV boots, clamps and axle seal for damage or leakage.
  • Rotate the wheel by hand and verify the axle moves smoothly without binding or contacting nearby components.
  • Perform a low-speed road test. Check for clicking while turning, clunking during acceleration, vibration and fluid leakage.
  • If suspension geometry was disturbed, have the wheel alignment checked.

Product Video

Product Description

12

Reviews

4.7/5

Based on 10 reviews

580%
410%
310%
20%
10%

Dr. DWC

10/11/2026

Verified buyer

I maintain several GM midsize SUVs for family members and friends, including a 2005 Chevrolet Trailblazer 4WD that had over 150,000 miles. The front passenger CV axle boot had torn open, slinging grease onto the lower control arm and causing rhythmic clicking noises when turning at low speeds. Because the driver side axle was equally aged, I opted to replace both front half-shafts together using this PHILTOP 60-1345 two-piece CV axle assembly kit.The replacement procedure on the GMT360 platform is relatively direct. After removing the front wheels, brake calipers, and disconnect bracket bolts, the old axles pulled out of the front differential disconnect assembly. The splines on these new PHILTOP shafts matched the factory GM dimensions cleanly. Both inner splines slid into the differential housing disconnect without excessive resistance, and the circlips seated with a firm click. The outer stub ends engaged into the front hub bearings smoothly, and the axle spindle nuts torqued down securely.The construction of these replacement axles is well executed. The rubber boots are thick and pliable, designed to withstand trail gravel and temperature changes without hardening. The stainless steel clamping bands are crimped evenly around the housings to prevent grease leakage. The constant velocity joints articulate smoothly by hand across their full range of angular motion with zero binding or axial sloppiness.Following installation, I test-drove the Trailblazer across various road conditions, including engaging four-wheel drive on gravel. The turning clicks are completely gone, and there is no driveline shudder under hard acceleration. The truck rides smooth and quiet at 70 miles per hour on the highway. This axle set provides dependable quality for keeping GMT360 trucks running strong.

Ibn Miller

08/31/2025

Verified buyer

They work very well.

FAQS

Fitment depends on the engine, transmission, and whether your car has ABS. Please enter your vehicle's Brand, Year, and Model into the "Fitment Checker" at the top of the page to confirm a match.

Most CV axles are side-specific due to different lengths. Please check the "Placement on Vehicle" section in our specifications table to ensure you are ordering the correct side for your repair.

The number of teeth (splines) on the ends must match exactly. Please refer to the "Technical Specifications" on this page to verify the Inner and Outer Spline counts before purchasing.