


Chris_GearHead_257

01/29/2026
Got these in two days, which was faster than expected. Everything was packed securely. Customer service was super responsive to my email query. Great service experience.

 Quick Ignition Response
High-Grade Insulation
Built to Last
Check if this fits your vehicle
Select a vehicle to check this product.
Check if this fits your vehicle
| Year | 1996 - 1997 | 1997 | 1996 - 1997 |
|---|---|---|---|
| Make | Suzuki | Suzuki | Suzuki |
| Model | Sidekick | Sidekick | Sidekick |
| Trim | JLX Sport | JS Sport | JX Sport |
| Engine | 1.8L L4 | 1.8L L4 | 1.8L L4 |
| Note | - | - | - |
 User manual (PDF)
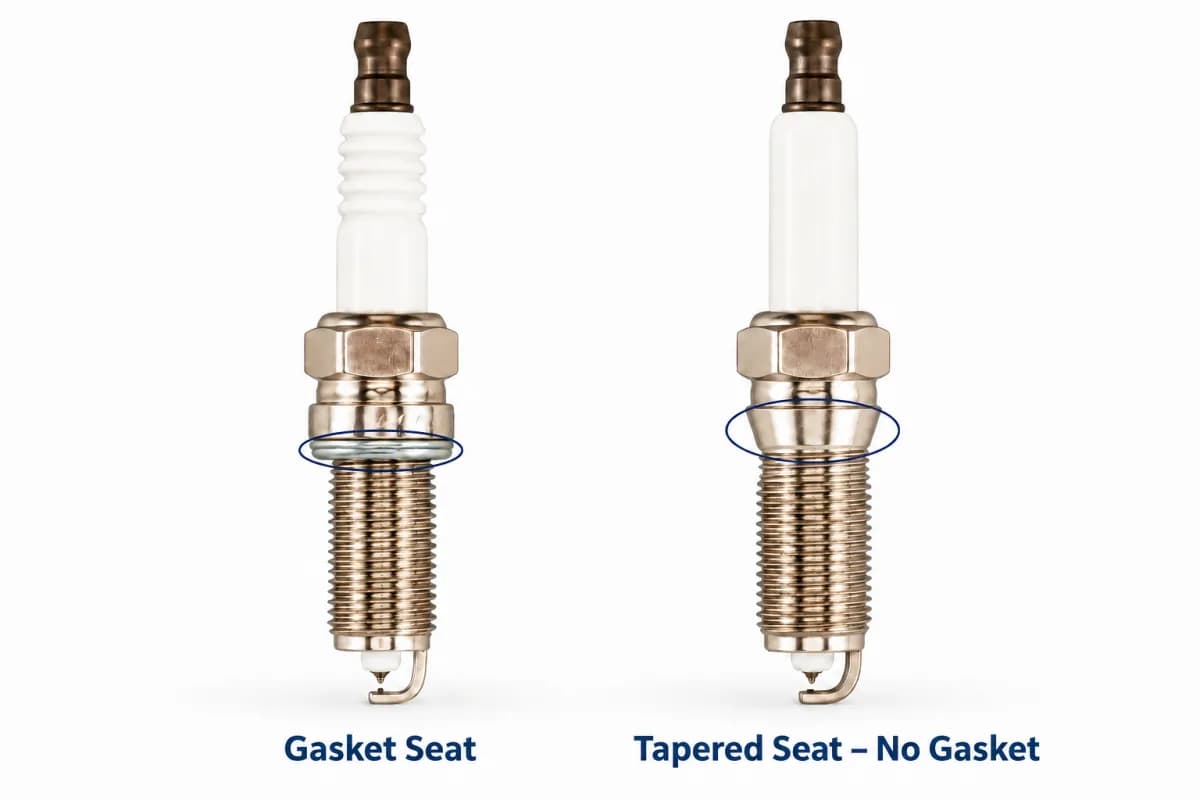
Gasket Seat Spark Plug: Uses a crush gasket to seal against the cylinder head.
Tapered Seat Spark Plug – No Gasket: Uses the tapered metal seat to seal directly against the cylinder head.
| Spark Plug Thread | Recommended Torque |
|---|---|
| 18 mm (M18) | 35–40 N·m (25.8–29.5 lb-ft) |
| 14 mm (M14) | 25–30 N·m (18.4–22.1 lb-ft) |
| 12 mm (M12) | 15–20 N·m (11.1–14.8 lb-ft) |
| 10 mm (M10) | 10–12 N·m (7.4–8.9 lb-ft) |
| 8 mm (M8) | 8–10 N·m (5.9–7.4 lb-ft) |
| Tapered Seat – No Gasket | 10–20 N·m (7.4–14.8 lb-ft) |
Important: This table is for general reference only. Required torque varies by spark-plug design, seat type and cylinder-head material. Always follow the vehicle service manual or spark-plug manufacturer’s specification when available.
4.3/5
Based on 6 reviews
Chris_GearHead_257
01/29/2026
Got these in two days, which was faster than expected. Everything was packed securely. Customer service was super responsive to my email query. Great service experience.
SarahDrives_991
02/26/2026
These were a direct fit and easy to swap out. My check engine light is gone and the car runs way better. Much cheaper than the auto parts store down the street.
No FAQs have been added for this product yet.
Loading vehicle options...
Choose Year, Make, and Model to check exact fitment.Quick Ignition Response
High-Grade Insulation
Built to Last
Check if this fits your vehicle
Select a vehicle to check this product.
6 reviews
5 star: 3
4 star: 2
3 star: 1
Check if this fits your vehicle
| Year | Make | Model | Trim | Engine | Notes |
|---|---|---|---|---|---|
| 1996 - 1997 | Suzuki | Sidekick | JLX Sport | 1.8L L4 | - |
| 1997 | Suzuki | Sidekick | JS Sport | 1.8L L4 | - |
| 1996 - 1997 | Suzuki | Sidekick | JX Sport | 1.8L L4 | - |
User manual (PDF)Gasket Seat Spark Plug: Uses a crush gasket to seal against the cylinder head.
Tapered Seat Spark Plug – No Gasket: Uses the tapered metal seat to seal directly against the cylinder head.
| Spark Plug Thread | Recommended Torque |
|---|---|
| 18 mm (M18) | 35–40 N·m (25.8–29.5 lb-ft) |
| 14 mm (M14) | 25–30 N·m (18.4–22.1 lb-ft) |
| 12 mm (M12) | 15–20 N·m (11.1–14.8 lb-ft) |
| 10 mm (M10) | 10–12 N·m (7.4–8.9 lb-ft) |
| 8 mm (M8) | 8–10 N·m (5.9–7.4 lb-ft) |
| Tapered Seat – No Gasket | 10–20 N·m (7.4–14.8 lb-ft) |
Important: This table is for general reference only. Required torque varies by spark-plug design, seat type and cylinder-head material. Always follow the vehicle service manual or spark-plug manufacturer’s specification when available.
4.3/5
Based on 6 reviews
Chris_GearHead_257
Jan 29,2026
Got these in two days, which was faster than expected. Everything was packed securely. Customer service was super responsive to my email query. Great service experience.
SarahDrives_991
Feb 26,2026
These were a direct fit and easy to swap out. My check engine light is gone and the car runs way better. Much cheaper than the auto parts store down the street.
No FAQs have been added for this product yet.
